Table of Contents
Product Image Enhancements v2.x Installation and User Manual
| Latest version: | 2.3.4 |
|---|---|
| Compatibility: | Magento 2.1.x, 2.2.x, 2.3.x,2.4.x |
Disclaimer
This is the installation and user manual for the Magento Product Image Enhancements v2.x extension created by Solide Webservices. Although great care has been taken to ensure the accuracy and completeness of this manual, Solide Webservices is unable to accept any legal responsibility concerning errors or ommisions in this document.
You are not allowed to copy or edit the content or the layout of this document. If you would like to redistribute the content of this document please contact Solide Webservices.
Installation, Upgrade and Deinstallation
Installation for extensions purchased throught the Magento Marketplace
If you purchased the extension through the Magento Marketplace, please follow the steps to install the extension as described in the Magento Docs here: https://docs.magento.com/marketplace/user_guide/buyers/install-extension.html
Installation for extensions purchased on https://solidewebservices.com
The zip package you have downloaded from the webshop of Solide Webservices contains a link to this manual and a folder called upload. This upload folder contains the files of the extension and will be used to install the extension through (s)FTP.
System Requirements
- Magento version 2.x or higher
- PHP version 5.6.0 for 2.x or 2.1 or PHP 7.1 for Magento 2.2
Installation through command line
Installing modules is a little different in Magento 2 and requires some technical knowledge. If you are unfamiliar with this please read the Magento2 documentation.
Follow the steps below to install the extension for the first time.
- Backup your web directory and webshop database;
- Disable caching;
- Extract the zipfile you have downloaded after your purchase and copy the content of the 'upload' folder to the root of your webshop (for instance using an FTP client);
- Navigate to your webshop root in the console of your SSH client and execute the following command:
php -f bin/magento module:enable SolideWebservices_Productimageenhancements --clear-static-content
- Then run the following command:
php -f bin/magento setup:upgrade
- Flush the cache en reenable it. Log out from the backend and log in again to refresh autorisations for the new transactions.
In case you are running a configuration different then the Magento recommended server configuration it may be required to run the following command to deploy the new static files:
php -f bin/magento setup:static-content:deploy
Upgrading through command line
- Backup your web directory and webshop database;
- Disable caching;
- Extract the zipfile you have downloaded after your purchase and copy the content of the 'upload' folder to the root of your webshop (for instance using an FTP client);
- Navigate to your webshop root in the console of your SSH client and execute the following command:
php -f bin/magento setup:upgrade
- Flush the cache en reenable it. Log out from the backend and log in again to refresh autorisations for the new transactions.
In case you are running a configuration different then the Magento recommended server configuration it may be required to run the following command to deploy the new static files:
php -f bin/magento setup:static-content:deploy
Uninstallation through command line
Installation of modules is done through the command line as well, for more information please have a look at the Magento2 documentation.
- Backup your web directory and webshop database;
- Disable caching;
- Navigate to your webshop root in the console of your SSH client and execute the following command:
php -f bin/magento module:disable SolideWebservices_Productimageenhancements --clear-static-content
- Flush the cache en reenable the cache again.
- Remove the folder called 'Productimageenhancements' located at /app/code/SolideWebservices/. If you have no other extension of Solide Webservices installed you can also remove the folder called 'SolideWebservices' in /app/code/.
Frontend
In this section you can see most of the functionality how it can be shown on the frontend of your Magento webshop. These are just examples but will give you a good idea of the endless posibilities.
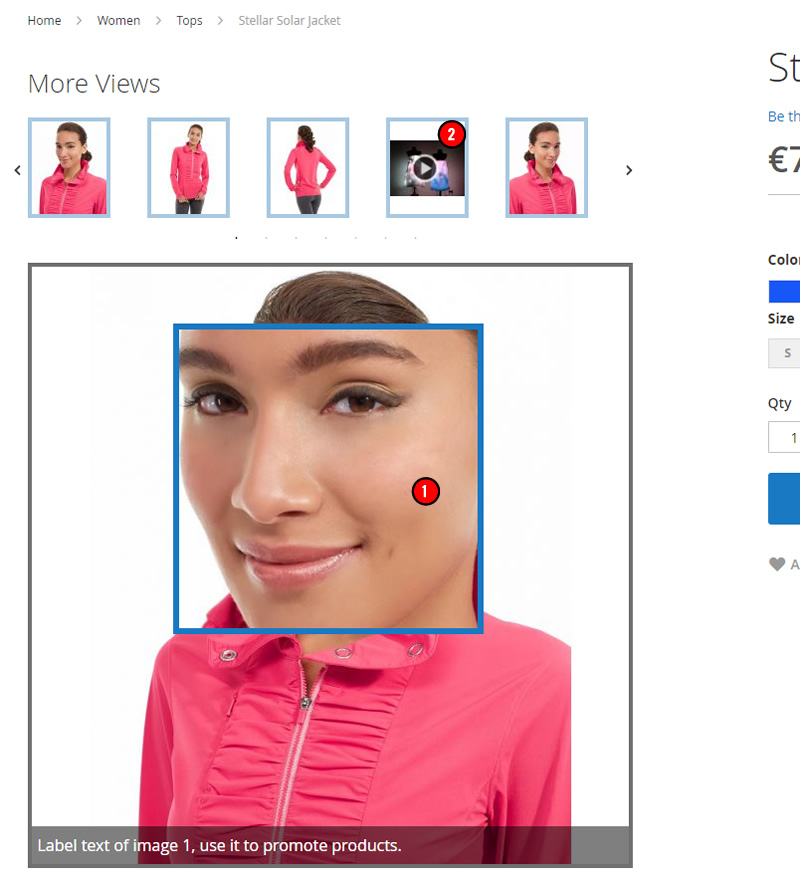
Zoom Window
Below is an example of the Product Image Enhancements on the frontend configured with a zoom window. All elements can be modified to your needs and theme.

- Main Product Image: the main can be responsive or have fixed width and height and can be styled to match your theme.
- Zoom Lens: the zoom lens can be square or rounded and can be styled to match your theme, also the behaviour can be configured.
- Zoom Window: the size, style, position and behaviour of the zoom window can be configured
- Product Image Thumbnails: the size, style and position of the thumbnails can be configured. You can also choose to show the thumbnails in a carousel slider which can be completely configured to your needs.
- Caption: Both the main product image and the zoomed in image shown in the zoom window can have captions from either the image label, short product description or long product description. The captions can be positioned and styled to your needs.
Zoom Lens
Below is an example of the Product Image Enhancements on the frontend configured with a zoom lens. All elements can be modified to your needs and theme.
- Zoom Lens: the image zoom can be configured with various types of zoom effects, the zoom lens uses an inline lens to zoom into the product image. The zoom lens can be sized and styled to your needs.
- Product Videos: also product videos from YouTube and Vimeo as added in the backend from Magento can be played.
Lightbox
In addition to image zoom and thumbail carousel functionality this extension comes with lightbox functionality when clicking on the main product image.

Backend Settings
The extension settings for the Product Image Enhancements extension can be found through the Magento backend menu under “Stores > Settings > Configuration > Solide Webservices > Product Image Enhancements”.
FIELDSET GENERAL
Use these settings to control the behaviour of the extension.
| Setting | Value | Description |
|---|---|---|
| Enable Extension | Yes / No | This allows you to enable or disable the extension on a global level. If “No” is selected here the product image zoom will be disabled on the frontend and the extension isnt loaded anymore. |
FIELDSET CONFIGURATION
In the configuration section you are able to tweak the extension to optimize it based on your needs.
| Setting | Value | Description |
|---|---|---|
| Zoom Type | Custom Select | Choose the zoom effect type here. Window shows the zoom in a seperate window, lens uses a lens en inner zooms inside the default image. |
| Minimum Required Viewport Size (px) | Number Of Pixels | Set the minimal width of the browser viewport to load the product image zoom and lightbox functionality. This can be used to disable the loading of the product image zoom and lightbox on mobile devices where you might not want this because of the smaller screens. |
| Scrollzoom | Yes / No | Set to “Yes” to enable scrolling with the mousewheel inside the zoom lens. |
FIELDSET MAIN PRODUCT IMAGE
In the main product image section you are able to configure the large product image shown on the product page. This is the image that will be zoomed.
| Setting | Value | Description |
|---|---|---|
| Main Product Image Size | Custom Select | Choose to load the main product image fully responsive (width=100%) or with a fixed width and height. |
| Main Product Image Width | Pixels | This field is only visible when “Main Product Image Size” is set to “Fixed”. Enter the width of the main image in pixels. The main image is the first image shown on the product page. |
| Main Product Image Height | Pixels | This field is only visible when “Main Product Image Size” is set to “Fixed”. Enter the height of the main image in pixels. The main image is the first image shown on the product page. |
| Main Product Image Border Size | Custom Select | Select the border thickness of the main product image. |
| Main Product Image Border Color | Colorpicker | This field is only visible when a border thickness of 1 or higher has been selected for the main product image. You can set the border color for the main image here. |
| Crossfade Main Image On Switching | Yes / No | Select “Yes” if you want to enable a crossfade between product images when selecting another product image from the thumbnail gallery. |
| Zoomfunction Behind Magnifying Glass | Yes / No | Select “Yes” to show a magnifying glass indicating the main product image needs to be clicked first to enable the zoom functionality. |
| Main Image Alt Text Source | Custom Select | Select which source field to use for the alt tag of the main image, this is useful for search engine optimization. Make sure that the field you select as source is actually filled in for your products. You can choose between “Label”, “Product Name”, “Short Description” and “Full Description”. |
FIELDSET THUMBNAILS
In the thumbnails section you are able to configure that thumbnail gallery that is shown below the main product image.
| Setting | Value | Description |
|---|---|---|
| Thumbnails Position | Custom Select | Set the location of the thumbnail gallery relative to the main product image. |
| Thumbnails Image Titles | Text | Choose the add an optional title above the thumbnails. Only available if the thumbnail position is set to above or below. |
| Thumbnail Image Width | Pixels | Enter the width of the thumbnails shown below the main image in pixels. |
| Thumbnail Image Height | Pixels | Enter the height of the thumbnails shown below the main image in pixels. |
| Thumbnail Border Size | Custom Select | Select the border thickness of the thumbnails in the gallery. |
| Thumbnail Border Color | Colorpicker | This field is only visible when a border thickness of 1 or higher has been selected for thumbnails. You can set the border color for the thumbnails here. |
| Thumbnail Hover Border Color | Colorpicker | This field is only visible when a border thickness of 1 or higher has been selected for thumbnails. You can set the hover border color for the thumbnails here. |
| Space Between Thumbnails And Main Product Image | Pixels | Set the space in pixels between the thumbnail gallery and the main product image. |
| Space Between Thumbnails | Pixels | This field is only visible when “Scroll Thumbnails” is set to “No”. You can set the space between the thumbnails here in pixels. |
| Scroll Thumbnails | Yes / No | Set to “Yes” to create a scrollable thumbnail carousel for the thumbnails gallery. |
| Maximum Width / Height Scroll Area | Pixels | This field is only visible when “Scroll Thumbnails” is set to “Yes”. You can limit the scrolling area for the thumbnails, for instance to line it up with the main product image. |
| Infinite Loop Thumbnails Scroll | Yes / No | This field is only visible when “Scroll Thumbnails” is set to “Yes”. Set this to “Yes” to make the thumbnails carousel loop through all the thumbnails. |
| Number Of Thumbnails To Show | Number | This field is only visible when “Scroll Thumbnails” is set to “Yes”. Set the number of visible thumbnails in the thumbnails carousel. |
| Number Of Thumbnails To Scroll | Number | This field is only visible when “Scroll Thumbnails” is set to “Yes”. Determine the number of thumbnails that will scroll at a time. |
| Scroll Navigation Arrow Color | Colorpicker | This field is only visible when “Scroll Thumbnails” is set to “Yes”. Set the color of the navigation arrows for the thumbnails carousel. |
| Scroll Navigation Arrow Hover Color | Colorpicker | This field is only visible when “Scroll Thumbnails” is set to “Yes”. Set the hover color of the navigation arrows for the thumbnails carousel. |
| Show Scroll Pagination Dots | Yes / No | This field is only visible when “Scroll Thumbnails” is set to “Yes” and the “Thumbnails Position” it set to “Above” or “Below”. Set this to “Yes” to show pagination dots below the thumbnails carousel which indicates the number of pages that can be scrolled. |
| Scroll Pagination Color | Colorpicker | This field is only visible when “Scroll Thumbnails” is set to “Yes”, the “Thumbnails Position” it set to “Above” or “Below” and the “Show Scroll Pagination Dots” is set to “Yes”. Set the color of the pagination dots here. |
| Scroll Pagination Active Color | Colorpicker | This field is only visible when “Scroll Thumbnails” is set to “Yes”, the “Thumbnails Position” it set to “Above” or “Below” and the “Show Scroll Pagination Dots” is set to “Yes”. Set the hover and active color of the pagination dots here. |
| Switch Main Image On Thumbnail Action | Custom Select | Select the behaviour on how the main product images is switched. Click will require a mouseclick on a thumbnail, hover will change the main product image when hovering over a thumbnail. |
| Thumbnails Alt Text Source | Custom Select | Select which source field to use for the alt tag of the thumbnails, this is useful for search engine optimization. Make sure that the field you select as source is actually filled in for your products. You can choose between “Label”, “Product Name”, “Short Description” and “Full Description”. |
FIELDSET ZOOM WINDOW
In the zoom window section you are able to configire the zoom window settings. This fieldset is only visible when the “Zoom Type” is set to “Window”.
| Setting | Value | Description |
|---|---|---|
| Zoom Window Width | Pixels | Set the width of the zoom window in pixels. |
| Zoom Window Height | Pixels | Set the height of the zoom window in pixels. |
| Zoom Window Position | Custom Select | This determines where the zoom window is show relative to the main image. You can see the different position by hovering over the comment below the field. |
| Zoom Window Offset-X | Pixels | The the X-Axis offset for the selected zoom window position for further fine-tuning of the zoom window position. |
| Zoom Window Offset-Y | Pixels | The the Y-Axis offset for the selected zoom window position for further fine-tuning of the zoom window position. |
| Zoom Window Border Size | Custom Select | Set the thickness of the border for the zoom window. |
| Zoom Window Border Color | Colorpicker | This field is only visible when a border thickness of 1 or higher has been selected for the zoom window. Set the color of the border of the zoom window. |
| Zoom Window Fade In | Milliseconds | Configure a fade-in for the zoom window in milliseconds. Leave blank for no fade-in. |
| Zoom Window Fade Out | Milliseconds | Configure a fade-out for the zoom window in milliseconds. Leave blank for no fade-out. |
| Zoom Window Shadow Or Glow | Custom Select | Determine if you want to set a shadow or glow effect for the zoom window. There are various effects to select from. |
| Zoom Window Shadow Or Glow Color | Colorpicker | Only visible when “Zoom Window Shadow or Glow” is not set to “None”. Set the color of the zoom window effect. |
| Zoom Window Easing | Yes / No | Enable of disable a easing effect within the zoom window. |
| Zoom Window Easing Amount | Number | Only visible when “Zoom Window Easing” is not set to “Yes”. You can set the amount of easing effect here. |
FIELDSET ZOOM LENS
In the zoom lens section you can configure the look and feel of the zoom lens. This section is only visible if “Zoom Type” is set to “Window” or “Lens”.
| Setting | Value | Description |
|---|---|---|
| Lens Size | Pixels | Only visible when “Zoom Type” is set to “Lens”. Set the size of the lens in pixels. |
| Lens Shape | Custom Select | Select the shape of the zoom lens, either round or square. |
| Lens Border Size | Custom Select | Select the border size of the zoom lens. |
| Lens Border Color | Colorpicker | This field is only visible when a border thickness of 1 or higher has been selected for the zoom lens. Set the color of the zoom lens border. |
| Lens Color | Colorpicker | This field is only visible when “Zoom Type” is set to “Window” and the “Main Product Image Tint” is disabled. You can set the color and opacity of the lens. |
| Lens Fade In | Milliseconds | This field is only visible when “Zoom Type” is set to “Lens”. Configure a fade-in for the zoom lens in milliseconds. Leave blank for no fade-in. |
| Lens Fade Out | Milliseconds | This field is only visible when “Zoom Type” is set to “Lens”. Configure a fade-out for the zoom lens in milliseconds. Leave blank for no fade-out. |
| Contain Lens Zoom | Yes / No | This field is only visible when “Zoom Type” is set to “Lens”. Set to “Yes” to make sure the lens does not fall outside the outside of the image |
FIELDSET MAIN PRODUCT IMAGE TINT
In the main product image tint section you are able to set a tint overlay for the main product image. This section is only visible when “Zoom Type” is set to “Window”.
| Setting | Value | Description |
|---|---|---|
| Enable Tint | Yes / No | Set a background tint which overlays the main product image outside the zoom lens. |
| Tint Color | Colorpicker | Only visible when “Enable Tint” is set to “Yes”. Set the tint overlay color for. Use the opacity for a transparent effect. |
| Zoom Window Tint Fade In | Milliseconds | Only visible when “Enable Tint” is set to “Yes”. Configure a fade-in for the zoom window tint in milliseconds. Leave blank for no fade-in. |
| Zoom Window Tint Fade Out | Milliseconds | Only visible when “Enable Tint” is set to “Yes”. Configure a fade-out for the zoom window tint in milliseconds. Leave blank for no fade-out. |
FIELDSET CAPTION
In the caption section you are able to configure a caption for the main product image and zoom window, the latter only when “Zoom Type” is set to “Window” or “Lens”. Captions are the product images titles as configured through the Magento backend.
| Setting | Value | Description |
|---|---|---|
| Caption Source | Custom Select | You can set the source field of the image caption. Make sure that the field you select as source is actually filled in for your products. You can choose between “Label”, “Product Name”, “Short Description” and “Full Description”. |
| Show Caption On Main Image | Yes / No | Enable or disable captions on the main product image. |
| Main Image Caption Background Color | Colorpicker | Only visible when “Show Caption On Main Image” is set to “Yes”. Set the background color for the main product image caption. Use the opacity for a transparent effect. |
| Main Image Caption Text Color | Colorpicker | Only visible when “Show Caption On Main Image” is set to “Yes”. Set the text color for the main product image caption. |
| Main Image Caption Textalign | Custom Select | Only visible when “Show Caption On Main Image” is set to “Yes”. Set the text alignment of the main product image caption. |
| Main Image Caption Position | Custom Select | Only visible when “Show Caption On Main Image” is set to “Yes”. Set the position of the main product image caption. |
| Show Caption On Zoom Window | Yes / No | Only visible when “Zoom Type” is set to “Window” or “Lens”. Enable or disable captions on the zoom window. |
| Zoom Window Caption Background Color | Colorpicker | Only visible when “Zoom Type” is set to “Window” or “Lens” and “Show Caption On Zoom Window” is set to “Yes”. Set the background color for the zoom window caption. Use the opacity for a transparent effect. |
| Zoom Window Caption Text Color | Colorpicker | Only visible when “Zoom Type” is set to “Window” or “Lens” and “Show Caption On Zoom Window” is set to “Yes”. Set the text color for the zoom window caption. |
| Zoom Window Caption Textalign | Custom Select | Only visible when “Zoom Type” is set to “Window” or “Lens” and “Show Caption On Zoom Window” is set to “Yes”. Set the text alignment of the zoom window caption. |
| Zoom Window Caption Position | Custom Select | Only visible when “Zoom Type” is set to “Window” or “Lens” and “Show Caption On Zoom Window” is set to “Yes”. Set the position of the zoom window caption. |
FIELDSET LIGHTBOX
In the lightbox section you are able to configure a lightbox which will appear when clicked on the main image. The lightbox will show a larger image of the product image in a lightbox viewer.
| Setting | Value | Description |
|---|---|---|
| Enable Lightbox | Yes / No | Enable or disable the lightbox feature. |
| Lightbox Theme | Custom Select | Select the theme of the lightbox display, either a light or a dark theme. |
| Lightbox Overlay Opacity | Custom Select | Set the opacity of the lightbox overlay. |
| Show Image Title | Yes / No | Show the image label above the product image photo in the lightbox. |
| Show Overlay Gallery Of Images | Yes / No | Choose to show a gallery of product images inside the lightbox. |
| Show SlideShow | Yes / No | Use slideshow and show buttons to control it within the lightbox. |
| SlideShow Autoplay | Yes / No | Automatically start sliding the images within the lightbox. |
| SlideShow Speed | Milliseconds | Set the speed of the slideshow in milliseconds. |
| Allow Lightbox Resize | Yes / No | Resize the lightbox based on the viewport or load the lightbox with the original product image size. |
Troubleshooting
In this section you will find answer to common issues.
I recieve a 404 error after installing the extension and going to one of the extension menu options.
This is a common issue when installing Magento extensions. It is caused because the permission for using the new extension havent been set for the currently logged in admin user. The solution is to logout and login again in the admin backend.
I installed the extension but it's not visible under the “Stores > Settings > Configuration” menu.
Make sure you have followed the installations steps and every one of them. Check if the extension has been installed under “System > Tools > Web Setup Wizard > Component Manager”. The extension should be listed as registered and enabled under this list. If this is not the case and you did upload the extension files as described in the installation steps you could try to run the following commands through a SSH client.
php -f bin/magento module:enable SolideWebservices_Flexslider --clear-static-content
php -f bin/magento setup:upgrade
I installed the extension but I only see a white area where the product image zoom should be displaying
This can happen when Magento is in production mode and the generation of static files has not been executed correctly. Make sure you clean out the following directories and deploy the static files again.
rm -rf pub/static/adminhtml/* pub/static/frontend/* pub/static/_requirejs/*
php bin/magento setup:static-content:deploy